
November 14, 2024
- Sign in and stow your phones out of sight. Log into a Chromebook and complete the WYAW activities.
- REMINDER: Chrome Extensions
To continue our exploration of web 2.0 tools related to collections or suites of tools, let's look at tools you can embed in your Chrome browser. These are helper apps that you can add directly into your browser. Check some of these out by installing them into your Chrome browser. You must install the two required and one other that you choose and pin them to your browser bar.
- Go to the Chrome Web Store and search through the options. Find one you like.
- Click on the link to the extension
- Click the blue "Add to Chrome" button and then again the "Add extension"
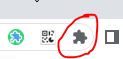
- Manage your extensions using the icon in the top right corner
- Find your extension and choose to pin it so you can access from your browser bar
- INSTALL: Grammar & Spell Checker: https://chrome.google.com/webstore/detail/grammar-spell-checker%E2%80%94lan/oldceeleldhonbafppcapldpdifcinji/related?hl=en&gl=BG&authuser=1
- INSTALL: Customize your YouTube viewing experience for your student with https://unhook.app/ (Choose Chrome option)
- OPTIONAL: Speechify - to have text read aloud on Google Docs, Webpages, etc. Check out the voices including Snoop Dogg (requires free sign in to work)
https://chrome.google.com/webstore/detail/speechify-text-to-speech/ljflmlehinmoeknoonhibbjpldiijjmm
- OPTIONAL: GoFullPage - full page screen capture
https://chrome.google.com/webstore/detail/gofullpage-full-page-scre/fdpohaocaechififmbbbbbknoalclacl/related
- OPTIONAL: Screencastify - screen recorder (Dr. Perkins' fav)
https://chrome.google.com/webstore/detail/screencastify-screen-vide/mmeijimgabbpbgpdklnllpncmdofkcpn
- Find other Extensions at: https://chrome.google.com/webstore/category/extensions or use the tiny rainbow icon in the top left of your browser bar
- Google Classroom. Used by millions of students and classrooms across the world:
- In 2021, the number of users was 150 million, mostly students but some businesses are using Classroom as well
- In 2020, Google Classroom became available in 10 additional languages
- It's estimated that Classroom users doubled in 2019-2020 during the pandemic
- In January 2022, Google Classroom recorded its largest-ever number of monthly downloads, at over 600,000 downloads in just one month
- Source: https://blog.google/outreach-initiatives/education/)
- Here are some other information sources about Google Classroom:
- What is Google Classroom? An overview
https://www.commonsense.org/education/articles/teachers-essential-guide-to-google-classroom - How Google Conquered the Classroom: The Googlification of Schools Worldwide
https://research.com/education/how-google-conquered-the-classroom - 16 Interesting Google Classroom Stats
https://thrivemyway.com/google-classroom-stats/
- Let's join a Google Class:
- 12:30 EDEL 446-01 / EDMG 466-01 CODE: mfwfldi
- 2:00 EDEL 446-02 CODE: xeiagfg
- Now, do the Where in the World activity and take the Geography Quiz.
- We'll do the NearPod activity together as a class with you as students. NOTE: Students can also use teacher created NearPods on an individual, self-paced basis. Your WYAW on Tuesday will be to explore and find your own Nearpods for your classroom.
STUDIO TIME: Creating a virtual tour using the Projects option in Google Earth.
- Google Timelapse: https://earthengine.google.com/timelapse/
- Google LitTrips: https://www.googlelittrips.org/
- Open Google Earth (https://earth.google.com/) on your Chromebook and start a new project using the New button. Make it a Drive project.
- Add a title and a 2-3 sentence description for your tour - personal or informational. Cite your source if you get info from the internet.
- Now you are ready to add locations by searching on your places:
- Search for a location - the place or a place within the place (e.g., Paris or the Eiffel Tower)
- Once at the location, look at the information box at the top right of the screen and choose "Save to Project" and keep the same information offered by Google.
- Next, click on the Pegman (little man icon in the lower right of the screen) and notice the blue circles around your added location. Explore them until you find one you like and add it to your project OR if you don't find a user-generated view you like, just click on the blue lines and set that view for your project.
- From within the photosphere view, save it to your project by using the "Capture this view" icon in the bottom left of the screen (Looks like a gray framed pin). Go back to your project and name this pin "My location 360 View"
- Do this for at least three locations or features for a total of six items in your list (two each for three locations).
- Your work is saved as you go in Google Drive as long as you are connected to the internet.
- To see your location map view or 360 view, double-click on the location pin in your list. You will zoom into that location.
- Go to Share for your project and choose "Share with anyone with the link" so I can view it.
- Send it to me via email or Remind.
- Search for a location - the place or a place within the place (e.g., Paris or the Eiffel Tower)
- Title and 2-3 sentence description for project location (cite source if not your own words)
- Three locations for a total of six pins: 1) map view with description from Google and 2) PhotoSphere (360 view) using the
- For each of your features/locations, label it appropriately "Statue of Liberty" or "Statue of Liberty 360 view".
- Set SHARE LINK to anyone with the link can view.
- Email or Remind message the link to me
- https://www.assortedstuff.com/stuff/14-ideas-for-google-earth-projects/
- Storytelling with Google Earth Projects: Bring the World to Your Classroom from Social Studies Samurai
https://www.youtube.com/watch?v=JfVC38x-iF8 - https://www.nationalgeographic.org/idea/getting-started-google-earth/
- https://www.teachstarter.com/us/blog/20-google-earth-activities-for-students-bringing-the-wow-factor-to-your-lessons-3/
- https://ditchthattextbook.com/google-earth-creation-tools/
Let's explore a few examples. But wait, there's more:
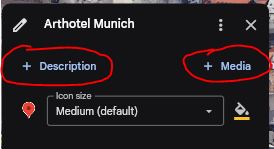
WANT A CHALLENGE? Instead of using the Google offered information, upload your own images and add your own description: You can add your own description and upload photos/images from your personal collection. To do this, choose the "Update" button for that feature (location/pin) and choose Description and Media to customize your location. REQUIREMENTS FOR THIS PROJECT |
GOOGLE EARTH RESOURCES
A good tutorial for how to create a tour in the new Google Earth
| Creating Tours in Google Earth (Web Version) October 3, 2023 // Richard Byrne // 9:34 |