
Purpose: This exercise will cover the basic procedures for laser cutting operations in OneCNC using the Profiler. Students will produce a I.D. tag or license plate displaying the ET LOGO. All CNC operations will be completed on the HAAS Z4-500 CNC laser machine located in the C.A.T.ET 449
CNC LASER OPERATIONS: ET LICENSE PLATE
Objectives: After completing this exercise you should be able to perform the following:
1. Import a dxf file into OneCNC
2. Edit the file for delineating required geometry
3. Set the coordinate system for laser operations
(profiling)
4. Select the geometry to be cut
5. Specify tooling information as required
6. Modify cut control as necessary
7. Generate a tool path for the part specified
8. Post process tool path for a HAAS machine
tool
9. Save the file as a PLAIN ASCII format
10. Download file to the HAAS Z4-500 Laser
11. Run the program (under supervision) and produce
the required part.
Procedures:
Prior to using OneCNC, create a model or 2D drawing of part shown in the following section. You may create the geometry using a 3D package of your choice (i.e. ProE, ProD) or create using AutoCad or equivalent.
Steps necessary for creating a tool path are provided with graphical
illustrations .
Major steps include the following:
STEPS:
1. Create DXF
2. Edit and
remove non-essential lines
3. Note text geometry must be exploded before a tool path can be generated
4. Change coordinate system to 2 AXIS
5. Move object so that 0,0 is located at the upper left corner of the part
6. 2 axis
7. Select profile Option
8. Select geometry to be machined
9. Click DONE and edit tool information
10. Edit Cut Control and turn on undercut
11. Select RETRACT AND CLEARANCE
12. Post Process tool path
13. Save and transfer to HAAS
14. Produce Part
STEPS:
1. CREATE A MODEL OF THE PART: USE CREATIVITY AND CUSTOMIZE YOUR LICENSE PLATE TO YOUR LIKING.
2. CREATE DRAWING: Refer to the dimensions as shown below:
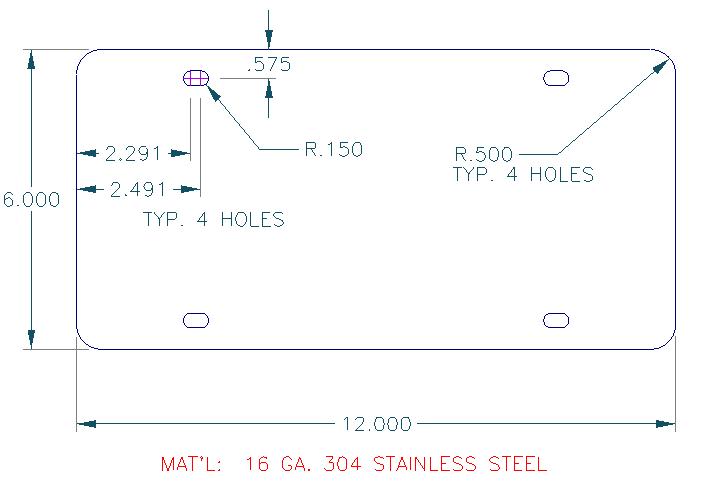
ILLUSTRATION X: TYPICAL LICENSE PLATE DIMENSIONS
4. SAVE AS DXF.
5. Import into CAM package and edit as necessary. See illustration
below for examples and suggestions.

6. After editing is complete verify cut.
7. Post Process as a 2 AXIS HAAS set up.
8. Edit Code as discussed in class to assure that laser is on ONLY at appropriate cutting positions!
9. Download to CNC laser.
10. Verify cut on machine (graphic mode).
11. Double check OFFSETS and G54
12. Run part (WITH INSTRUCTOR PRESENT ! )
13. Submit laboratory report using standard format.